
Table of Contents
- Why Do Candles Tunnel When Burning? The Science of the Melt Pool
- Common Causes of Tunneling: From Wick Size to Ambient Temperature
- How Long to Burn a Candle for the First Time (and Why It Sets the Memory)
- Proper Candle Wick Trimming: The Step Most People Skip
- How to Fix a Tunneled Candle: 3 Methods That Actually Work
- Preventing Tunneling: Wax Type Nuances and Room Conditions
- Frequently Asked Questions
Last Updated: September 27, 2026
Why Do Candles Tunnel When Burning? The Science of the Melt Pool
Candles tunnel when the flame melts only a narrow circle in the center, leaving a hard ring of unused wax around the edge. The cause is almost always a melt pool that never reaches the full width of the vessel.
What a Full Melt Pool Means for Burn Time
A full melt pool is a layer of liquid wax that reaches the edge of the container on all sides, forming within one to four hours of lighting depending on the vessel's width.
Common Causes of Tunneling: From Wick Size to Ambient Temperature
Most tunneling traces back to one of five causes:
-
Wick too small for the jar. A short wick cannot throw enough heat to the edges.
-
Wick too long. A tall flame burns hot and fast in the center, not wide.
-
A short first burn. The pool never reaches the rim, so the candle "learns" a narrow shape.
-
Cold rooms. Wax needs warmth to melt across the full surface.
-
Drafts. Moving air pushes the flame off-center and creates an uneven burn.
Wick Size and Vessel Diameter: The Mismatch That Starts the Tunnel
The wick must match the width of the container. A wide jar needs a larger wick or more than one wick to melt the surface evenly, because a single small wick cannot reach the sides before the center burns down. That is why Forth & Nomad's Vetiver & Fig and Blood Orange & Teak candles each use two.

How Long to Burn a Candle for the First Time (and Why It Sets the Memory)
Burn a new candle for one hour for every inch of its diameter, up to a maximum of four hours, a 3-inch-wide jar needs about three hours on the first burn. That first session sets the candle memory: the wax remembers the shape of that first melt pool, so blowing it out after 30 minutes tends to lock in that narrow pattern.
The rule is simple:
- Light the candle on a stable, heat-safe surface.
- Let the pool reach the rim before you put it out.
- Never burn longer than four hours at a stretch.
- Let the wax cool and harden fully before relighting.
Proper Candle Wick Trimming: The Step Most People Skip
Trim the wick to 1/4 inch before every single burn, the most effective habit for preventing a tunnel. An untrimmed wick grows a mushroom-shaped tip that throws a tall, smoky flame, burns hot in the middle, and leaves soot on the glass. Trimming keeps the flame steady and spreads heat evenly.
A few more habits that help:
- Trim while the candle is cool, never right after blowing it out.
- Pinch off the charred tip with a wick trimmer rather than scissors.
- Remove any trimmings from the wax surface before lighting.
- Keep the wick centered as the candle burns down.
How to Fix a Tunneled Candle: 3 Methods That Actually Work
You can fix a tunneled candle, but you have to melt the rim back down to the level of the center. Three methods work, ranked from easiest to most involved, the advanced ones are for tunnels deeper than the foil can reach.
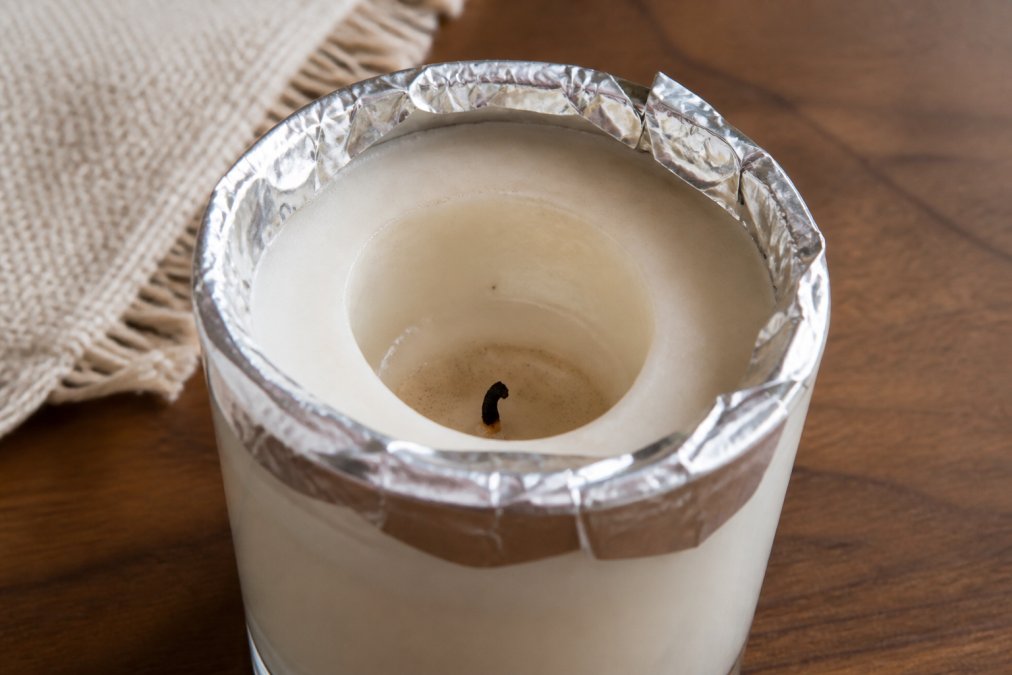
Method 1: The Foil Wrap (Best for Shallow Tunnels)
Wrap the top of the jar in aluminum foil, leaving a small opening over the wick. The foil traps heat and reflects it back onto the rim, so the edges melt down to match the center:
- Trim the wick to 1/4 inch and remove any debris from the wax surface.
- Tear a piece of foil large enough to cover the jar opening with a few inches of overhang.
- Fold the foil over the rim and press it down so it stays in place.
- Cut or poke a hole roughly the size of a quarter directly above the wick.
- Light the candle and let it burn in one-hour increments, checking the rim each time.
- When the pool reaches the edge, remove the foil and let the candle cool completely before relighting.
Method 2: The Wax Reservoir (Best for Medium Tunnels)
For a tunnel that has left a wall of hard wax around the rim, you can level the surface without melting the whole top layer.
- Use a butter knife or a dedicated wax tool to gently scrape soft wax shavings from the tunneled wall.
- Press the shavings into the low center of the tunnel, filling the gap until the surface is roughly level.
- Alternatively, pour a small amount of melted wax from a separate candle into the gap.
- Let the wax harden fully, at least an hour, before trimming the wick and relighting.
Method 3: The Heat Gun and Hot Water Bath (Best for Deep Tunnels)
When the tunnel is more than an inch deep, the rim is too thick for foil and too tall for shavings. You need to melt the top layer down.
Preventing Tunneling: Wax Type Nuances and Room Conditions
Prevention comes down to three things: wax type, wick care, and the room itself. Get those right and tunneling becomes rare. The wax in your jar changes how the pool forms, how fast it reaches the rim, and how forgiving it is when your burn habits slip.
How Wax Type Changes the Melt Pool
Every wax has a melt point, the temperature at which it turns liquid, and that number drives how a candle tunnels.
- Paraffin wax has a relatively high melt point and a fast, wide melt pool. It throws scent strongly and reaches the rim quickly, which is why it is forgiving of a slightly undersized wick. The trade-off: paraffin burns hot, so an oversized wick or long flame can overheat the jar and scorch the wax surface.
- Soy wax has a lower melt point and a slower, narrower pool. It burns cooler and cleaner, but needs more time, and often a larger wick, to reach the edge of a wide vessel. In a cool room, soy is the wax most likely to tunnel because the rim resists melting while the center burns down.
- Beeswax has the highest melt point of the common candle waxes. It burns very slowly and holds a narrow pool longer than any other wax, so it demands a well-matched wick and a patient first burn, and is the least tolerant of a short first burn.
- Blends combine a harder wax with a softer one to balance melt point, scent throw, and pool width. A soy-paraffin blend, for example, pools more evenly than pure soy while burning cooler than pure paraffin, which is why many makers use blends rather than a single wax.
Room Conditions That Push a Candle Toward Tunneling
Ambient temperature below about 65°F makes wax slow to melt at the edges, so the center pools first and the rim stays hard. Above roughly 80°F, the wax softens unevenly and the wick can lean or drown. The sweet spot is a still room between 65°F and 80°F.

A Quick Diagnostic: If It Looks Like This, Do That
Use the surface of the candle as your guide. The shape of the wax tells you what went wrong before you ever need to guess.
| What You See | What It Means | What To Do |
|---|---|---|
| Thin tunnel, wide hard rim | Short first burn | Foil wrap, then reburn to the edge |
| Flame leans to one side | Draft or off-center wick | Move the candle, recenter the wick |
| Deep tunnel, thick wall | Undersized wick for the wax and jar | Reservoir method or hot water bath |
| Soot on the glass | Wick too long | Trim to 1/4 inch every burn |
| Slow, dim flame | Cold room or wick too short | Move to a warmer spot, check wick length |
| Wax climbing the glass | Wick too large or burn too long | Trim shorter, cap burns at four hours |
Frequently Asked Questions
How do you stop candles from tunneling?
Stop tunneling by giving the candle a full melt pool on the first burn, which means burning it long enough for the wax to reach the container edge. Trim the wick to 1/4 inch before every use, keep the candle away from drafts, and never burn longer than four hours at a time. These habits train the candle memory and prevent the hard wax ring that causes tunneling.
What is the 3-hour rule for candles?
The 3-hour rule suggests burning a candle for no more than three to four hours per session. After that, the wick can mushroom, the fragrance oil may burn off, and the wax can overheat. For tunneling prevention, the first burn is the exception: you may need two to three hours just to reach a full melt pool, depending on vessel diameter. After that, stick to shorter cycles.
Can you reverse candle tunneling?
Yes, you can reverse mild tunneling. The foil wrap method traps heat around the rim, melting the hard wax ring so the melt pool can even out. For deeper tunnels, use a wax reservoir technique to level the surface. Severely tunneled candles may not fully recover, but proper wick trimming and first-burn care prevent most cases.
Does trimming the wick prevent candle tunneling?
Proper candle wick trimming to 1/4 inch before each burn is one of the most effective ways to prevent tunneling. A long wick creates a larger flame that burns hot and fast down the center, leaving wax on the sides. A trimmed wick burns more evenly and helps the melt pool reach the vessel edge. Pair trimming with a snuffer to extinguish without disturbing the wax.